

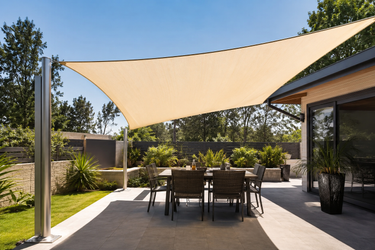
Best Angle for Shade Sail Installation: Prevent Water Pooling and Improve Performance
Installing a shade sail at the correct angle is essential for preventing water pooling, improving drainage, and extending the life of the fabric. For most residential installations, the best angle for shade sail installation is achieved by creating a height difference of approximately 12–24 inches (30–60 cm) between the highest and lowest anchor points. The exact slope depends on the sail's size, material, and local weather conditions.
A properly installed shade sail angle improves rainwater runoff, maintains even shade sail tension, and reduces stress on both the fabric and mounting hardware. In this guide, you'll learn how to choose the right shade sail slope, avoid common installation mistakes, and achieve better long-term performance.
Why Does Shade Sail Installation Angle Matter?
The installation angle affects much more than appearance. It determines how efficiently your shade sail handles sunlight, wind, and rain throughout the year.
A sail installed too flat is more likely to collect water, lose tension, and experience premature wear. By creating the proper shade sail slope, you can improve drainage, increase stability, and help the sail maintain its original shape for longer.
How Proper Angle Improves Shade Performance
A correctly angled shade sail stays smooth and evenly tensioned, providing consistent shade while reducing wrinkles and fabric movement.
The right proper shade sail height also improves airflow beneath breathable fabrics, making outdoor spaces more comfortable during warm weather. For waterproof models, the slope allows rainwater to flow naturally toward the lowest corner instead of collecting in the center.
Preventing Water Pooling and Fabric Sagging
One of the main reasons for installing a shade sail at an angle is to prevent water pooling.
Standing water adds significant weight to the fabric. According to engineering calculations, 1 inch (25 mm) of water weighs about 5.2 lb/ft² (25 kg/m²), creating extra stress on the sail, mounting hardware, and support posts.
Over time, this may result in:
- Fabric stretching
- Permanent sagging
- Hardware damage
- Reduced product lifespan
Maintaining both the correct shade sail angle and proper shade sail tension helps distribute loads evenly and supports effective shade sail drainage.
What Is the Best Angle for a Shade Sail?
There is no single installation angle that works for every project. The ideal setup depends on the sail's material, dimensions, local climate, and mounting conditions.
Rather than measuring an exact angle, installers usually create a height difference between anchor points to ensure reliable drainage.
Recommended Height Difference Between Anchor Points
For most residential projects, the following guidelines provide effective shade sail drainage while maintaining a clean appearance.
| Shade Sail Size | Suggested Height Difference |
|---|---|
| Small (up to 10 ft / 3 m) | 12–16 in (30–40 cm) |
| Medium (10–16 ft / 3–5 m) | 16–20 in (40–50 cm) |
| Large (over 16 ft / 5 m) | 20–24 in (50–60 cm) or more |
Larger shade sails generally require a greater height difference because longer spans are more likely to deflect under tension.
Before installing posts or wall brackets, plan the proper shade sail height carefully. Making adjustments during installation is much easier than correcting drainage problems later.
Minimum Slope for Waterproof vs. Breathable Shade Sails
Different fabrics require different installation approaches.
Waterproof Shade Sails
Waterproof shade sails should always be installed with a noticeable shade sail slope. Since the fabric blocks rain completely, an adequate slope allows water to run off quickly and reduces the risk of pooling.
In areas with frequent rainfall, increasing the height difference between anchor points can further improve drainage and reduce maintenance.
Breathable Shade Sails
Breathable HDPE shade sails allow water to pass through the fabric, but they should not be installed completely flat.
A slight shade sail angle helps:
Maintain even fabric tension Reduce wind movement Improve appearance Prevent debris from collecting on the fabric Regardless of the material, combining the correct slope with proper shade sail tension is essential for long-lasting performance.
Choosing the Right Angle for Different Shade Sail Shapes
The best angle for shade sail installation also depends on the sail's shape. Triangle, rectangle, and square shade sails distribute weight differently, so each requires a slightly different installation approach. Matching the shade sail slope to the sail's design helps improve drainage, maintain fabric tension, and reduce stress on the mounting hardware.
Triangle Shade Sails
Triangle shade sails naturally create a sloped surface because they have three anchor points. For the best results, position one corner lower than the other two to provide a clear drainage path.
Their aerodynamic shape also performs well in windy areas, making triangle sails a popular choice for gardens, patios, and poolside spaces. Keep the fabric evenly tensioned to minimize movement during strong winds.
Rectangle and Square Shade Sails
Rectangle and square shade sails provide larger shaded areas but require more careful installation.
Instead of mounting all corners at the same height, create a diagonal slope by positioning two opposite corners higher than the others. This improves shade sail drainage, reduces the chance of water pooling, and helps the fabric remain evenly tensioned.
For larger waterproof sails, a greater height difference often delivers better rainwater runoff and long-term stability.
Multiple Overlapping Shade Sails
Installing multiple shade sails is an effective way to cover large outdoor areas while creating a modern layered appearance.
Each sail should have its own drainage direction and shade sail angle rather than relying on adjacent sails for support. Leave enough space between sails to improve airflow and ensure water from an upper sail does not drain directly onto a lower one.
How Installation Angle Affects Wind and Rain Performance
A shade sail is exposed to changing weather throughout the year. The correct installation angle helps the fabric perform better in both windy and rainy conditions while reducing long-term wear.
Reducing Wind Flapping and Fabric Stress
Loose fabric moves continuously in the wind, increasing stress on the edges, stitching, and mounting hardware.
Maintaining proper shade sail tension keeps the fabric stable and allows wind to flow over the sail more smoothly. In windy locations, use strong mounting hardware, avoid oversized unsupported spans, and install the sail with an adequate shade sail slope to reduce wind pressure.
Improving Rainwater Runoff on Waterproof Shade Sails
Waterproof shade sails rely entirely on the installation angle for drainage.
Without enough slope, rainwater can collect in the center, gradually stretching the fabric and creating deeper pockets after each storm. Installing the sail with the best angle for shade sail installation allows water to flow quickly toward the lowest corner, reducing maintenance and extending the sail's lifespan.
It's also a good idea to remove leaves and debris regularly, as blocked drainage paths can lead to water pooling even when the installation angle is correct.
Common Shade Sail Installation Angle Mistakes
Many installation problems can be avoided with proper planning. The following mistakes are among the most common and can significantly reduce your shade sail's performance.
Installing All Corners at the Same Height
Although a level installation may look symmetrical, it often prevents effective shade sail drainage, especially for waterproof fabrics.
Creating a noticeable height difference between anchor points allows rainwater to run off naturally and helps the sail maintain its shape over time.
Insufficient Tension and Loose Fabric
Even with the correct shade sail angle, loose fabric can wrinkle, flap in the wind, and collect water.
Tighten each corner evenly until the sail is smooth and firm. After installation, check the tension again after a few days, as minor adjustments are often needed once the hardware settles.
Ignoring Local Climate and Wind Direction
Weather conditions should always be considered when planning a shade sail installation. Areas with frequent rainfall may require a steeper shade sail slope, while windy locations often benefit from stronger support posts and heavier-duty hardware. Designing the installation around local conditions improves both safety and long-term durability.
Tips for Achieving the Correct Installation Angle
If you're installing a shade sail for the first time, understanding the basic installation process is just as important as choosing the correct angle.
Creating the best angle for shade sail installation begins with careful planning. Correct anchor placement, proper tension, and regular inspections all contribute to better drainage and longer-lasting performance.
Planning Anchor Point Heights
Before installing posts or wall brackets, decide where rainwater should drain. Position one or more anchor points lower than the others to create a clear shade sail slope.
Remember to leave enough space for turnbuckles or other tensioning hardware. Planning the proper shade sail height from the beginning makes installation easier and reduces the need for later adjustments.
Using Turnbuckles for Fine-Tuning Tension
Turnbuckles make it easy to adjust shade sail tension after installation.
Tighten each corner gradually rather than one at a time to keep the fabric evenly stretched. The sail should remain smooth without being overtightened, as excessive force may place unnecessary stress on the mounting hardware.
Checking the Angle After Installation
After the first rainfall, inspect the sail to ensure water drains properly and does not collect in low spots.
Regular maintenance should include checking fabric tension, mounting hardware, and signs of wear. Small adjustments made early can help preserve the correct shade sail angle and extend the sail's service life.
When Should You Consider a Custom Shade Sail?
Standard-size shade sails work well for many installations, but they may not provide the best fit for every outdoor space.
Irregular Spaces That Need Custom Sizing
Areas with unusual dimensions, existing structures, or landscaping features often require a custom solution. A made-to-measure sail provides better coverage while making it easier to achieve the correct shade sail slope and drainage.
Why Custom Designs Improve Drainage and Stabilit
A custom shade sail allows anchor points and fabric dimensions to match your installation area more precisely. This helps maintain even shade sail tension, improves rainwater runoff, and creates a cleaner, more professional appearance.
Conclusion
The best angle for shade sail installation plays a key role in preventing water pooling, improving drainage, and increasing the lifespan of your shade sail. By combining the correct shade sail slope, proper shade sail tension, and carefully planned anchor heights, you can create a durable and attractive outdoor shade solution.
If your project has an irregular layout or requires a more precise fit, a custom-made shade sail can simplify installation and deliver better long-term performance. Sunlax Outdoor offers made-to-measure shade sails designed to fit a wide range of residential and commercial spaces, making it easier to achieve reliable drainage, stability, and lasting shade.
FAQ
What is the best angle for shade sail installation?
For most residential installations, a height difference of approximately 12–24 inches (30–60 cm) between the highest and lowest anchor points provides effective drainage and helps maintain proper fabric tension. The ideal angle depends on the sail's size, shape, material, and local weather conditions.
Can a shade sail be installed flat?
A completely flat installation is generally not recommended, especially for waterproof shade sails. Without a sufficient shade sail slope, rainwater can collect on the fabric, increasing the risk of sagging and hardware damage.
Do breathable shade sails still need an angle?
Yes. Although breathable HDPE fabrics allow water to pass through, a slight shade sail angle helps improve fabric tension, reduce wind movement, and prevent debris from accumulating on the surface.
How tight should a shade sail be?
The fabric should be evenly tensioned so that it remains smooth without excessive wrinkles. Proper shade sail tension reduces wind flapping, supports better drainage, and extends the lifespan of both the fabric and the mounting hardware.