

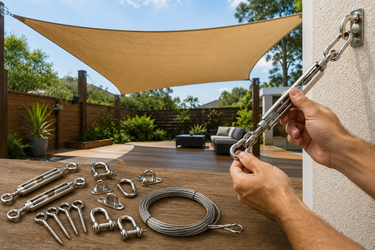
Shade Sail Hardware Kit Guide for Safe Installations
Installing a shade sail safely starts with choosing the right shade sail hardware kit. Even the highest-quality shade sail cannot perform as intended if it is paired with weak or unsuitable hardware. A complete shade sail installation hardware system keeps the sail securely tensioned, distributes wind loads evenly, and helps extend the service life of both the fabric and its supporting structure.
According to general engineering principles for outdoor tensile structures, shade sail systems should be designed with a safety factor of at least 1.5 to 2 times expected wind load. This is why professional-grade shade sail hardware kits typically use marine-grade stainless steel hardware for load-bearing connections.
Whether you are mounting shade sail systems above a patio, garden, pool, deck, or commercial outdoor area, understanding each hardware component is essential before installation. This guide explains how every part works, how to choose the correct shade sail attachment kit, and how to install everything safely for long-lasting performance.
What Is a Shade Sail Hardware Kit?
A shade sail hardware kit is a collection of connection and tensioning components designed to securely attach a shade sail to existing structures or dedicated support posts. Rather than serving as simple accessories, these components form the structural connection between the sail and its anchor points, allowing the entire system to remain stable under constant tension.
A typical shade sail installation hardware kit may include turnbuckles, pad eyes, eye bolts, snap hooks, D-shackles, extension chains, and other fasteners. Depending on the installation site, some projects also require shade sail poles or wire ropes to create suitable anchor locations when walls or mature trees are unavailable.
Each piece has a specific purpose. Turnbuckles provide adjustable tension, anchor fittings transfer loads into walls or posts, while connectors allow secure attachment between hardware and the sail's reinforced corner rings. Working together, these components help distribute forces evenly across the entire shade sail instead of concentrating stress on a single point.
Because shade sails are intentionally installed under high tension, selecting compatible hardware is just as important as selecting the fabric itself. Using undersized fittings or low-quality materials can reduce system stability and increase maintenance requirements over time.
Why Quality Hardware Matters for Safety and Longevity
Many first-time installers focus primarily on the shade fabric, but experienced installers understand that the hardware often determines the overall durability of the installation.
Unlike traditional canopies, shade sails are pre-tensioned structures. Wind does not simply push against the fabric—it transfers significant loads directly through the shade sail hardware kit into each anchor point. During strong winds, these forces can increase substantially, making hardware strength a critical safety consideration.
High-quality stainless steel hardware, especially marine-grade stainless steel, provides several important advantages. It resists corrosion, maintains strength in humid and coastal environments, and reduces the likelihood of rust staining surrounding walls, decks, or support posts. These characteristics make it a preferred choice for long-term residential and commercial installations. Reliable shade sail installation hardware also makes maintenance easier. Adjustable turnbuckles allow seasonal tension corrections as the fabric naturally relaxes over time, while corrosion-resistant fittings remain easier to inspect, loosen, or replace when necessary.
Another important factor is compatibility. A complete shade sail attachment kit is designed so that each component works together under load. Mixing incompatible hardware from different sources may result in uneven tension or unexpected stress at individual connection points.
From an E-E-A-T perspective, manufacturers and professional installers generally recommend selecting hardware that clearly specifies material grade, working load capacity, and intended application. Transparent product specifications help buyers evaluate whether the hardware is appropriate for their installation rather than relying solely on appearance or price.
Choosing durable hardware may increase the initial investment slightly, but it often reduces maintenance costs and replacement frequency throughout the life of the shade sail, making it a more cost-effective solution over the long term.
Essential Shade Sail Hardware Components
A complete shade sail hardware kit is made up of several key components, each serving a specific structural role in a shade sail installation hardware system. Understanding how each part works helps ensure safe mounting shade sail setups and reduces the risk of installation failure under wind load or long-term tension.
Most professional installations rely on stainless steel hardware because it offers higher tensile strength and corrosion resistance compared to zinc-plated alternatives. Below is a breakdown of the essential components found in a typical shade sail attachment kit.
Turnbuckles — Tension and Fine-Tuning
Turnbuckles are one of the most important components in any shade sail hardware kit. They are used to adjust tension after installation, ensuring the sail remains tight and stable.
A turnbuckle shade sail setup allows installers to fine-tune tension gradually instead of relying on fixed-length connections. This is especially important because shade sails naturally stretch slightly over time due to fabric behavior and environmental exposure.
High-quality turnbuckles made from stainless steel hardware can withstand outdoor conditions without seizing or rusting. In professional shade sail installation hardware systems, turnbuckles are usually installed on at least one corner to allow seasonal re-tightening.
Pad Eyes / Eye Bolts — Wall and Post Anchors
Pad eyes and eye bolts serve as fixed anchor points that transfer load from the shade sail into a solid structure such as a wall, concrete surface, or wooden post.
In most mounting shade sail projects, these anchors are installed at structurally reinforced points to ensure stability under tension. The quality of these anchors is critical because they bear continuous pulling force from the sail.
A well-designed shade sail attachment kit includes heavy-duty pad eyes with pre-drilled holes that allow secure fastening using bolts or screws. Stainless steel versions are preferred for long-term outdoor durability.
Carabiners and Snap Hooks — Quick Connection
Carabiners and snap hooks provide a fast and removable connection between the sail corners and anchor points.
These components are commonly included in a shade sail hardware kit because they allow easy installation and removal during cleaning, seasonal changes, or storm preparation.
In modern shade sail installations, locking carabiners are preferred over basic hooks because they reduce the risk of accidental detachment. For residential setups, they also make DIY mounting shade sail projects much easier to manage.
D-Shackles — Secure Corner Links
D-shackles are heavy-duty connectors used to attach sail corners to other hardware components such as turnbuckles or pad eyes.
Unlike snap hooks, D-shackles provide a more permanent and secure connection, making them essential in high-tension shade sail attachment kit configurations.
Because shade sails experience constant tension, using stainless steel hardware shackles helps prevent deformation and ensures long-term safety. They are especially important in larger installations or commercial outdoor areas.
Extension Chains / Wire Ropes — Reaching Distant Anchors
Extension chains or wire ropes are used when anchor points are not perfectly aligned with shade sail corners. They help bridge distance gaps and improve installation flexibility.
In many shade sail installation hardware setups, wire ropes are preferred for larger sails because they offer higher strength-to-weight ratios and better tension distribution.
Chains, on the other hand, are easier to adjust but may introduce slightly more movement in the system. Both options are commonly included in advanced shade sail hardware kit configurations.
Mounting Poles — When You Don't Have a Wall or Tree
When natural or existing structures are unavailable, installers use dedicated shade sail poles to create anchor points.
These poles are a critical part of professional mounting shade sail systems, especially in open gardens, patios, or commercial spaces. They are typically installed in concrete footings to ensure stability under load.
High-quality poles used in shade sail installation hardware systems are often galvanized or powder-coated steel, designed to resist bending and corrosion. Their height and positioning directly affect sail tension and drainage angle, making correct installation essential.
How to Choose the Right Hardware Kit for Your Shade Sail
Selecting the right shade sail hardware kit depends on sail shape, installation environment, and load requirements. A mismatch between hardware and sail geometry can lead to uneven tension or premature wear.
Triangle vs. Rectangle / Square: Different Hardware Needs
Triangle sails typically require higher tension at each corner, meaning the turnbuckle shade sail component becomes more critical for balancing force distribution.
Square or rectangular sails, on the other hand, often need more complex shade sail installation hardware setups because they cover larger surface areas and experience greater wind load.
Regardless of shape, a properly designed shade sail attachment kit ensures each corner shares load evenly to prevent overstressing any single anchor point.
Stainless Steel vs. Galvanized Steel: Durability Comparison
Stainless steel hardware is generally considered the premium choice for shade sail systems due to its corrosion resistance and long service life.
Galvanized steel is more cost-effective but may show signs of rust over time, especially in coastal or humid environments. For long-term mounting shade sail installations, stainless steel is usually recommended.
The choice often depends on budget and environment, but professional installers typically prefer stainless steel for critical load-bearing components.
Load Capacity: What Rating Do You Need?
Every shade sail hardware kit should clearly specify working load limits. These ratings ensure that hardware can safely handle both static tension and dynamic wind forces.
As a general guideline, larger sails require higher-rated shade sail installation hardware, especially for turnbuckles and anchor points.
Ignoring load ratings can result in system failure, particularly in regions with strong seasonal winds. This is why professional-grade shade sail attachment kit products always include tested load specifications.
Step-by-Step: Installing Shade Sail Hardware
A complete shade sail hardware kit plays a critical role in ensuring that the entire installation system performs safely under wind load and tension. Whether you are using a residential patio setup or a commercial outdoor structure, choosing the correct shade sail installation hardware directly affects durability, safety, and long-term maintenance costs. Poor-quality components can lead to uneven tension and premature wear.
A proper installation using a shade sail hardware kit ensures safety, stability, and long-term durability. Whether you are working with a small patio sail or a large commercial structure, following a structured process helps reduce mistakes and ensures even tension across the entire system.
Before starting, always verify that your shade sail installation hardware is rated for outdoor use and that all anchor points are structurally sound. Weak surfaces such as thin wood panels or decorative fencing should not be used for load-bearing mounting.
Step 1: Mark Your Anchor Points
Begin by identifying and marking all anchor locations. A standard mounting shade sail setup requires at least three or four anchor points depending on sail shape.
Make sure each point is positioned to create proper tension angles, allowing water runoff and wind flow. Incorrect spacing is one of the most common causes of sagging in a shade sail attachment kit installation.
Step 2: Install Pad Eyes on Walls or Wooden Posts
Once anchor points are confirmed, install pad eyes or eye bolts securely into walls, concrete, or wooden posts.
These anchors form the structural base of your shade sail hardware kit, so proper installation depth and fastener type are critical. In most cases, stainless steel hardware is preferred to avoid rust and long-term degradation.
When working with a full shade sail attachment kit, it is important to ensure all components are compatible before tightening the system. Many installation issues occur not because of the fabric, but due to mismatched stainless steel hardware or incorrectly rated connectors.
Step 3: Set Up Mounting Poles (If Needed)
If natural anchor points are not available, install shade sail poles into concrete footings.
Poles must be installed at correct angles and depths to handle wind load. In professional shade sail installation hardware systems, pole height differences are often used to improve drainage and tension balance.
Step 4: Attach Turnbuckles and Connectors
Connect the sail corners using carabiners or D-shackles, then attach turnbuckles to at least one corner of each side.
A properly installed turnbuckle shade sail system allows gradual tightening after initial setup, ensuring even tension distribution across all anchor points.
At this stage, ensure all components of the shade sail attachment kit are properly locked and aligned before applying full tension.
Step 5: Tension the Sail Evenly
Gradually tighten the turnbuckles until the sail surface is firm but not overstressed.
Over-tensioning is a common mistake that can damage both fabric and hardware. A correctly installed shade sail hardware kit should maintain a smooth, slightly curved surface that resists wind while allowing minimal flex.
Common Shade Sail Hardware Mistakes to Avoid
Even with high-quality materials, incorrect installation can reduce system performance. Many failures in shade sail installation hardware setups come from avoidable mistakes rather than product defects.
Industry guidelines for outdoor tensile structures recommend regular inspection of all shade sail installation hardware to ensure that corrosion or fatigue does not compromise structural integrity over time.
Using Weak or Rust-Prone Materials
One of the most frequent errors is using low-grade or non-rated hardware. Non-stainless components can corrode quickly, especially in outdoor environments.
Using proper stainless steel hardware ensures long-term durability and reduces safety risks in tensioned shade sail hardware kit systems.
Incorrect Anchor Spacing and Angles
Improper spacing between anchor points leads to uneven tension distribution. This can cause sagging or excessive stress at corners.
A well-planned mounting shade sail layout always considers wind direction and drainage angles before installation begins.
Over-Tightening and Corner Stress
Another common issue is over-tightening the system. While tension is necessary, excessive force can damage both the sail and the shade sail attachment kit components.
A properly balanced turnbuckle shade sail system should be firm but still allow slight flexibility under wind load.
Where to Buy Shade Sail Hardware
Choosing a reliable supplier is just as important as selecting the right components. A complete shade sail hardware kit should come with clearly specified load ratings, corrosion resistance information, and installation compatibility guidance.
Professional-grade shade sail installation hardware is usually available from outdoor living specialists rather than general hardware stores, as they provide more application-specific products such as shade sail poles and custom anchor systems.
For users looking for integrated solutions, manufacturers like Sunlax Outdoor offer coordinated systems including shade sails, shade sail attachment kit options, and installation accessories designed to work together. Their product collections are especially useful for customers who want consistent sizing, material compatibility, and easier installation planning.
You can explore related systems such as custom shade sails and outdoor shade collections to better match your installation needs with compatible hardware solutions.
Conclusion
A properly designed shade sail hardware kit and high-quality shade sail installation hardware are essential for safe and durable outdoor shading systems.
By selecting high-quality shade sail installation hardware and corrosion-resistant stainless steel hardware, users can significantly extend the lifespan of their shade structure.
For those looking for reliable and well-matched systems, Sunlax Outdoor provides coordinated shade solutions that combine durable materials with practical installation design, making it easier to build stable and long-lasting outdoor shading environments.